Test Cups for a Client
I cut fabric for the fitting band in A Client's Fitting Band - Part 1. I show assembly in A Client's Fitting Band - Part 2. Then I cut and sewed tester cups in Test Cups for A Client. Here's my summary of how the fitting went.

My client measured as a cup #2 in a Regular 34 Porcelynne wire in a 28 band with a torso shape of V6. So, to have a few sizes to try like you would shopping in a store, I made cup # 1, 2, & 3. The frustrating store experience of band sizes that are different numbers to try to find the right sister size that will fit is basically eliminated with this fitting band and basting in cups way of trying on bras. Cup #2 was a little big for my client and cup #1 fit perfectly. No alterations were needed for this client, I just moved down a cup size and it worked out. Below I have pictures of the assembly process.
The Assembly
1. I always mark front, apex, base of the vertical seam, and front. It's too easy to mess it up otherwise. (As my bra friend Dale says, "Ask me how I know." )


3. I stitched the vertical seam of the lower cup. I don't recommend back stitches at the apex because it can cause the fabric to have a bump that shows through shirts. The goal is to hide the nipple, not make it stand out.

I recommend to hold the tail of thread and lightly pull at the back to keep your fabric from getting sucked down into the machine. (Some machines are more prone to this than others and if your fabric gets sucked down often, then I would start at the base of the cup and start up 1/4 inch, stitch up to the apex, turn and stitch back down to the base and back stitch at the base to reinforce the area you skipped to get started.)

I got to the end and put my needle down and pivoted...

... and stitched the other direction exactly on the first line of stitching so the seam could still be pressed open.


4. I pressed the seam open. It helps sink the stitches into the fabric and then I don't have to fight with the seam when I topstitch.


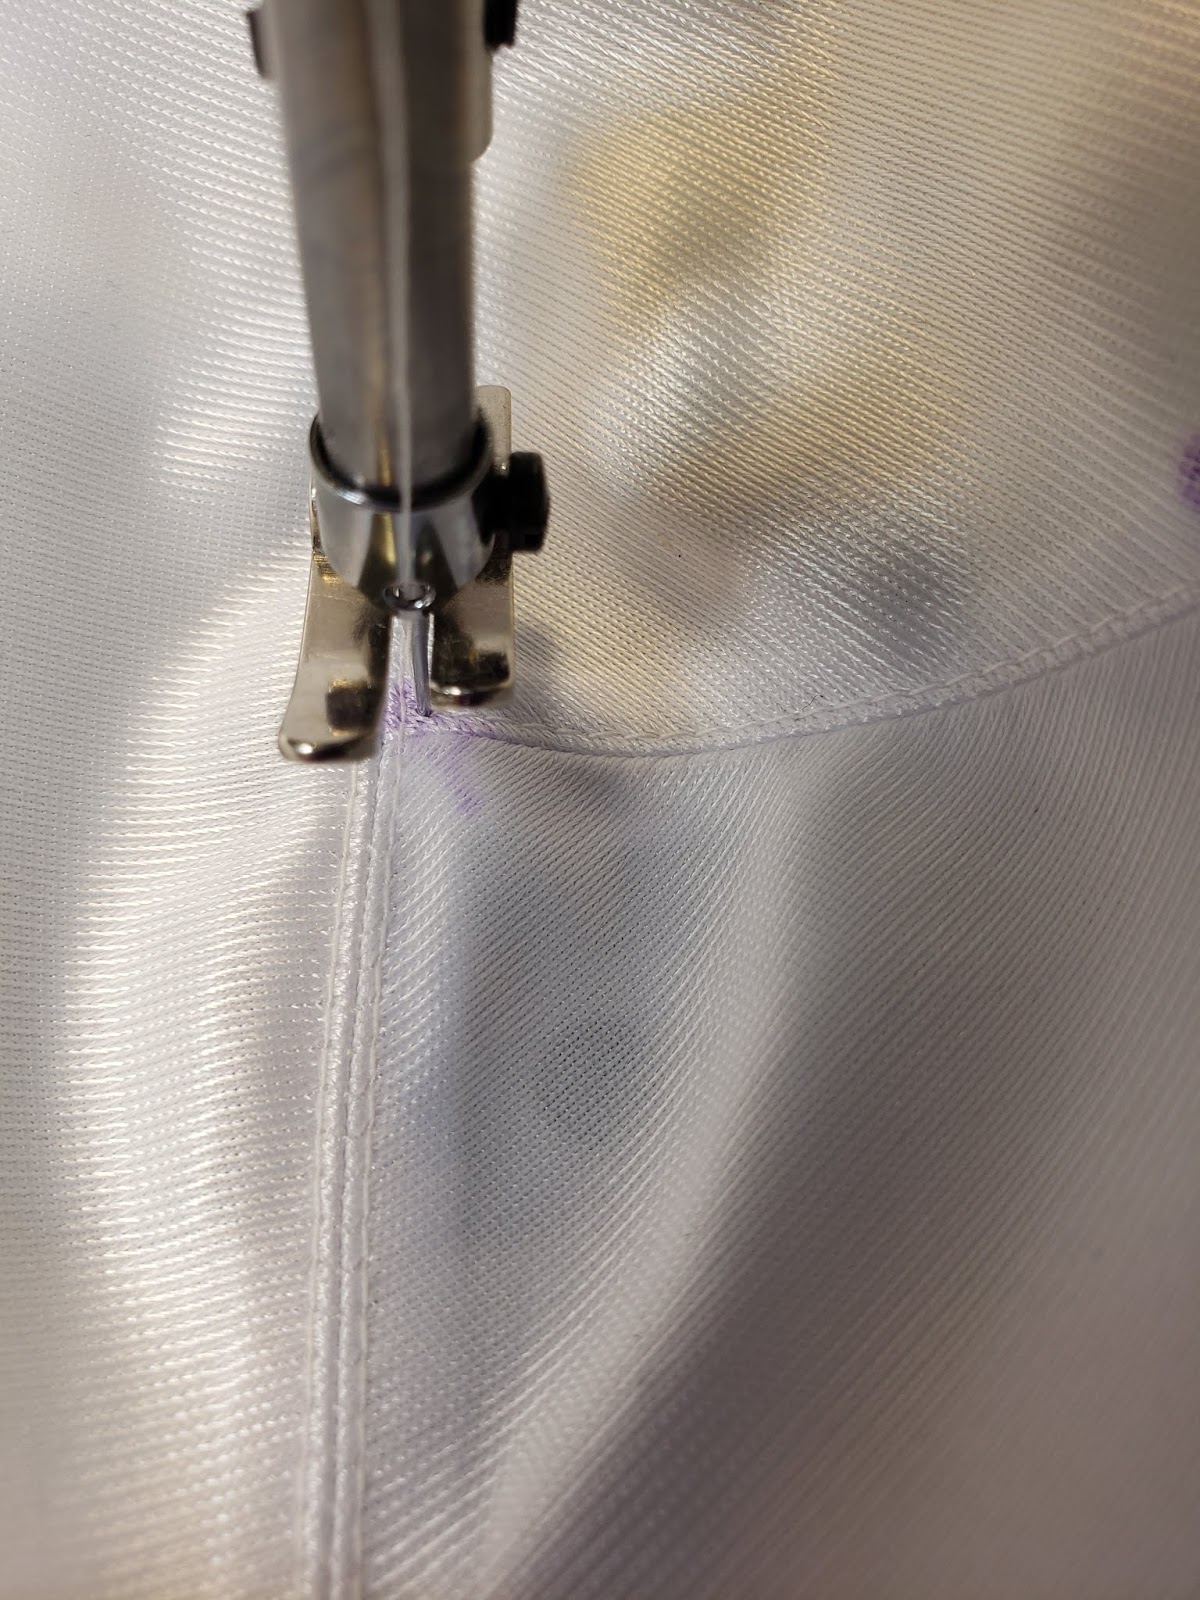
5. When lining up the upper cup to the lower cup, I match the seam allowances, not the corners. (see the purple line on the cup.)


6. There's a scant amount more of the lower cup almost visible by the rippling in this first picture.

I slightly stretched the cup, so it evenly distributes the wrinkles and put a pin at the apex so the fullness is spread evenly.

7. I stitched the cups together. I always place whichever side of the cups has more fullness to the feed dogs to ease it together.

Also, I put some slight pressure while stitching, but not too much... Just enough to make the fullness disappear again.

I pivoted around and sewed back the other direction, very carefully to match the stitches so it could be pressed open.


8. I pressed the seams open.

9. I topstitched 1 - 2 mm from the seam to flatten this seam as much as possible.


At this point, I topstitched up the vertical seam.

I turned and topstitched the seam allowance from the horizontal seam just below the horizontal seam's top stitching.
10. I applied elastics to the neckline and armhole areas of the cup because I'm making these cups to be used with generic adjustable fitting bands in my shop, so I'm building my inventory of cup sizes. This could be skipped for most cups in the testing process.
I started with an extra 1/4 inch of elastic hanging off the end because once you turn it inward to the cup, it is at an angle and if I don't lead with a little extra, then it won't go to the end of the cup and won't be caught in the seam allowance.

I started at the side cup so it would be covered by the neckline elastic when it gets turned.

Once I was most of the way sewn, I clipped the elastic off at the neckline seam allowance so it's not super bulky when the neckline gets turned over. (see purple indicating the seam allowance at the end of the elastic)

I turned it to the inside, and it's still too long where my thumb is, but not by as much as it first seemed like when I started on the outside. Also, you can see how I stopped at the seam allowance at the strap point.

Here's how it looked after topstitching.

Again, I left 1/4 inch extra for the first pass to allow for the angles once it gets turned.


Once it is turned to the inside, almost the whole 1/4 inch of lead space is needed for topstitching the elastic to the inside.

After I completed the second pass, that is when I cut the elastic at the center front of the cup.

I then trimmed the tail of the neckline elastic at the strap attachment area by sliding my scissors in behind the scallops of the armhole elastics to get a clean line right at the edge. If I were putting this cup in a finished bra, I would bartack the strap on at this point to look like most of the ready-to-wear bras that I have worked on in our alterations shop

End Results
The completed cup, ready to be basted into the fitting band.


0 comments
Please be kind, y'all!