facebook
  • Project Sewing Vault
    • Sewing Courses
    • Link List and NEWSLETTER SIGNUP
    • My Sewing Shop's Blog
  • About Me
  • Bra-Making Blog
    • Sew Your Own!
    • Never Sewn Before? Start Here!
    • How to wear your bra
    • Bra Making Fabrics
    • Measuring for Bras
    • Wire Fitting
    • Wire Alterations
    • Fitting Bands
    • Band Alterations
    • Fitting Cups
    • Cup Alterations
    • Sloper Manipulations
    • Sew Alongs
    • History of Bras
    • A Day in the Life
    • Gallery
    • The Process of a Custom Bra
      • The Process of a Custom Bra
      • Why Have Custom Bras?
      • Wire Fitting
      • The Fitting Band
      • Drafting for Volume
      • Creating a Sloper
      • Pattern Design
      • Sewing a Bra
      • How to wear your bra
  • Learn to Sew
The Eve:
Why this pattern is
Revolutionary to
Bra Making

Bras by Kristen

Explaining the process of bra drafting for potential clients or drafting students.

 Here's the final installment on Anne Bertha's guest posts regarding root traces and wire alterations!

How to shape your wire

by Anne Bertha

So, you’ve made a plaster cast but you’re not sure how to translate this three dimensional

shape to a two dimensional pattern? Then this post is perfect for you.

Making a bridge pattern and wire trace off your cast

What you’ll need:

● Your cast (well duh)

● Paper

● Masking tape

● Some sort of flexible wire

I first present you... My cast!
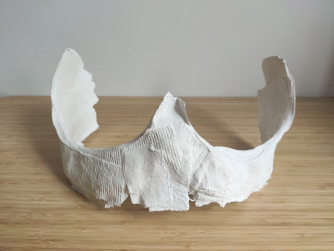
Let’s start with the bridge pattern. Stick a few pieces of masking tape to the inside of the cast

bridge, carefully peel it off and stick it again on a sheet of paper. There’s no need to follow

the wire line to the millimeter, we’ll take care of that later.
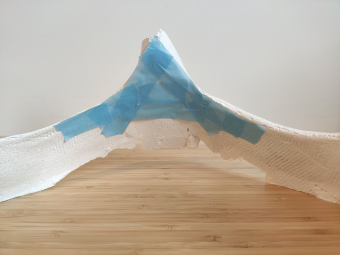
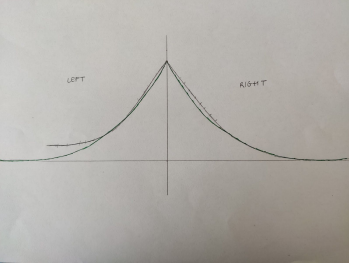
Then, trace your bridge shape to another piece of paper and label it left and right.

Remember that these will not be mirrored! After this, my bridge pattern looks like this.

Next, it’s time to take your flexible wire and mould it to one of the wire lines of the cast. This

can be tricky to do with acceptable accuracy, so make sure you take your time.

Remember when I said we’ll do something about the inaccuracy of the wire line at the

bridge? The time is now. Simply make a copy of your bridge, lay your wire on the according

side of and trace the bit at the bridge. My actual wire trace is marked in green in the picture

below. Note: the low point of your left and right breast root might not be on a horizontal line

as in my case, one might be lower than the other. This can best be determined standing in

front of a mirror. You want to account for it in this step if applicable.
Now it’s time to determine whether you’re one of the lucky people who fits in a ‘standard’

wire. Print off some wire charts and match your flexible wire to the charts. Try rotating it,

flipping it, whatever may work for you. If you find a match, awesome! The quest ends here

for you. For the other ones, I will describe a method you can use to shape wires after your

individual shape.

A little bit of science

The method I’ll be using was developed by a fellow Bare Essentials drafter. She used the

property of metal that when hammered on a particular area, that area will stretch. This forces

the metal to bend slightly. A wire is basically a flat, thin strip of metal which is bent. You can

manipulate this bending by hammering on the inside or the outside of the wire with the ball

end of a ball-peen hammer. I’ll explain this using the picture of a metal ruler.

If you would want to curve it like in the picture below, it means that the top will have to be

longer than the bottom.

To get this result, we would have to hammer the top of the ruler since we want that side to

lengthen. Basically, that’s the technique used to shape wires after your very own trace.

How to apply the science

First, some preparation steps. Trace the inside of the flexible wire. The center front is fixed, I

marked a black dot there to show that this is the highest point of my bridge. The side

however is more up for interpretation, the height kind of depends on how high you made

your cast. It will work for now, you can determine the exact side height afterwards by trying

on your customized wires.

To get started with the next few steps, you’ll need uncoated wires. I started from regular

wires size 60. They are not heavy gauge, so I will be doubling them up inside the

channeling. The fact that they are a more regular gauge does mean that the following

process will be easier.

You will need a ball-peen hammer and an anvil or a table vise with anvil-like attachment.

Start at center front, and lay the inside of your wire against the trace. Try following the traced

line as far as possible. You’ll notice that at some point, the trace and the actual wire will

diverge. Mark this point on both sides of the wire.

If you would recreate this image, you would notice that if you ‘stretch’ the wire to match the

trace, you actually need to stretch the inside of the wire. This means I needed to hammer on

the inside of the wire around the marked point (going 1⁄2” or 1.2 cm left and right) to bend the

wire into the shape of the trace. Always make sure you hammer on both sides of the wire

(front and back), since otherwise the wire will distort.

After hammering, the wire looks like this. I again marked the diverging point. Now, the wire

needs to be stretched and thus hammered on the outside to make the wire curve inward

towards the trace.
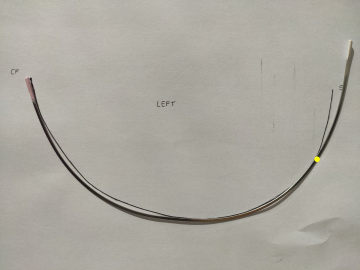
Here’s the final result. Be sure to mark your wire as soon as you finish them.


Acknowledgement: this post would not have been possible without the knowledge of Grace

Horne. I will always be grateful to her.
Here's another guest post by Anne Bertha, involving root tracing and figuring out wire shapes. This is more of a 3D root trace to get an idea of whether or not the wire could have a bend, twist, or other Manipulation.

How to Make a Plaster Cast

by Anne Bertha

Slight nudity warning!

I’ve been making bras for two years now. Very soon in that process, people told me

that the first thing you should do is search for a wire that fits you. Well, that proved to

be very difficult. By now I have a whole range of different sizes and styles of wires,

but none of them really seem to fit me. After noticing a post on Facebook of

someone who made a plaster cast of her ribcage and seeing the transformation in

bra fit, I decided to make my own plaster cast. This is the tutorial.

You will need:

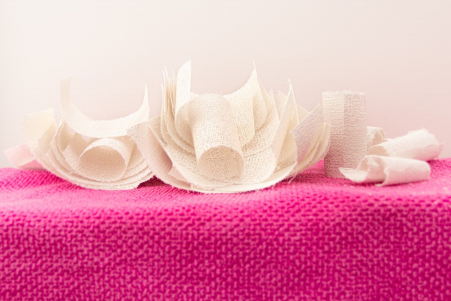
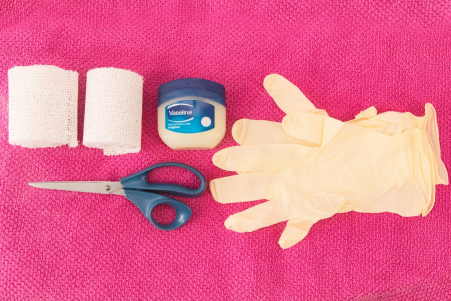
● Plaster gauze. For a cast of one underbust, I used 2 rolls of 3 m by 7.5 cm

(3.3 yds by 3 inches).

● Scissors, to cut the plaster gauze in pieces.

● Latex (or other) gloves. It gets real messy.

● Petroleum jelly or olive oil. You want the cast to come off your body easily.

For my first try, I used petroleum jelly and for the second one, I used olive oil.

I must say I liked the olive oil better. It’s just easier to wash off afterwards.

● A bucket (not the best one you have).

● Towels (not the best ones you have) or a sheet of plastic to cover your

working station.

● Preferably a person to put the cast on you. It can be done by yourself, but that

makes it much harder.

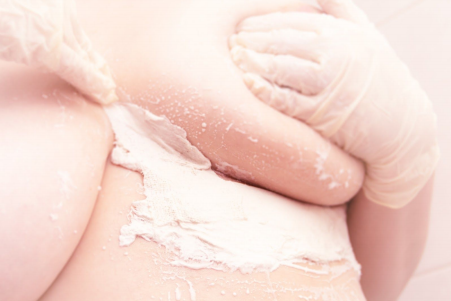
When doing my cast, I stood in the bathtub. There will be splashing of plaster drops,

so make sure you think about that beforehand. A day after making the cast, I still find

plaster spots everywhere in my bathroom.

How to do it:

1. Gather all of your materials, and put them near you. Make a workstation,

preferably at a convenient height. Especially when you do your cast yourself,

you don’t want to move too much or else the cast in progress will also move.

2. Cut up the plaster gauze in pieces of different lengths. When doing a cast of

your whole underbust, make sure you have two piles, one for each underbust.

That way the cast will more likely be evenly thick around.

3. You want to wear as few clothes as possible. I advise a bikini bottom which

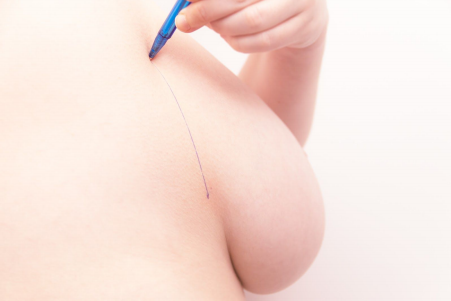
will wash out easily. If the side of your breast crease is hard to identify like

mine, mark it with a (non-permanent) marker.

4. Fill the bucket with water of the temperature indicated on the plaster gauze

packaging.

5. Find a comfortable position. This can be seated or standing, try to sit or stand

as naturally as possible.

6. Put on the gloves. Time to do this!

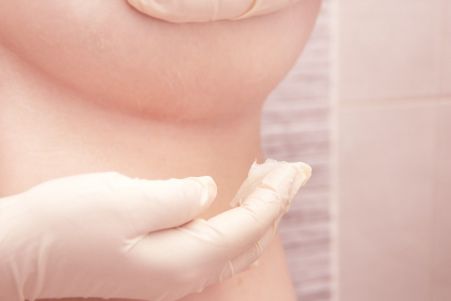
7. Apply vaseline or olive oil to your underbust, it’s best to cover a slightly larger

area to be sure it will all come off easily. It’s best to be thorough but don’t add

a layer that’s too thick because otherwise the plaster won’t stick well and slide

down.

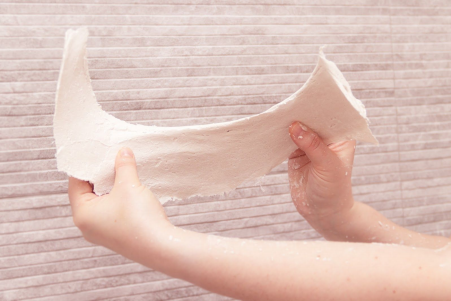
8. Pick up a piece of the plaster gauze, put it in water and take it out. Run it

through two fingers so the excess water comes off, and stick it to your body.

9. Repeat to cover the whole area you want a cast of. Work sequentially from

one side to another, and work as fast as possible. How quickly the plaster

dries depends on a lot of factors, but mine did that quite fast.

10.You’ll notice at some point that the cast will start feeling loose, that’s a sign it’s

drying. I followed the instructions on the plaster gauze so I stood for about 15

minutes in the bathtub waiting for the cast to be dry enough to be taken off my

body.

11.If you want to speed up the drying process, take out the hairdryer and apply

some heat to both the outside and the inside (if you can reach it) of the cast.

12.Gently put the cast somewhere it can dry completely. Depending on

thickness, this might take up to 48 hours. Make sure to flip it carefully once

one side is dry.

13.Take a good look at your own plaster imprint! You can’t see my smile on the

picture but it was quite large.

Notes: the type of plaster gauze varies from manufacturer to manufacturer. I first

tried making a cast using rolls from a hobby shop for this tutorial, for my second one

I used rolls from the pharmacy. Those were substantially softer before use and

harder set after use.

The following is a guest post by Anne Bertha.  Anne's root shape was different enough to require more shaping to her wires than most people, so she worked, ever so diligently, to sort out what she needed to make her bras work for her. 

Root Trace Methods

by Anne Bertha 

While some people find their wire shape and size easily, it can prove to be a real

challenge for others. There are some ways you can make this process easier

however. All the methods have one idea in common: to make a mould of your

ribcage so you can decide which wires are the best fit. There’s always a compromise

to be made between ease, cost and accuracy.

I will be discussing the pros and cons of three methods: using masking tape, tin foil

and making a plaster cast. Finally, I’m showing you my root trace on paper.

First up: masking tape mould.

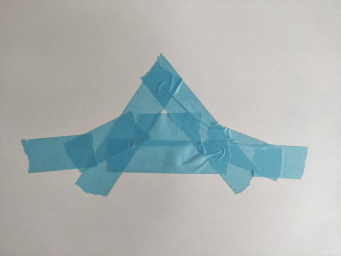
The idea behind this one is quite simple: by sticking layers of masking tape to your

body and carefully peeling it off, you’re able to replicate your wire root shape on

paper in 2D.

Notes: You want to make a construction in which your breasts are encased, with kind

of like anchor points. Otherwise, when you peel your tape construction off, it will lose

its shape.

Pros: Easy and cheap way to get a rough idea of your root shape.


Cons: Can be painful to peel off, depending on the masking tape itself. Because you

mould it to your body (3D) and try sticking it to paper (2D) afterwards, it’s not that

accurate. It can be quite tricky to figure out how to stick it to paper without distorting

the shape.

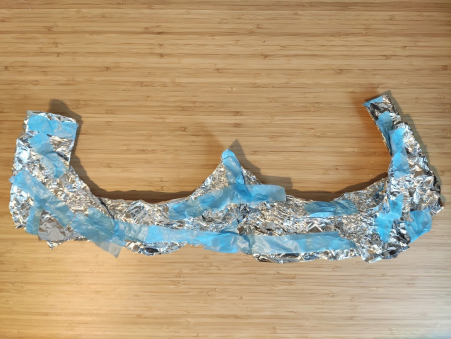
Second: tin foil mould.

Tin foil has an interesting property: it’s malleable and will hold its shape quite well. I

made this one by moulding pieces of tin foil to my body and sticking them together

as well as to my body using masking tape.

Notes: Try and keep the mould quite flat. I folded some tin foil, shaped it, but in some

places I got a little overexcited and the tin foil piled up. It won’t stick to the masking

tape as well then.

Pros: Easy and cheap way. A bit more expensive than the tape mould, but also

much more accurate.


Cons: There is a hint of a 3D shape there, but it’s still much more of a 2D shape. You

don’t get a clear idea if your ribcage is particularly cylindrical and you might need to

bend your wires or not.

Third: plaster cast

For a how-to, read the separate blog post. Because this shape is very 3D, it can be

tricky to translate it to paper to get an idea of your wire size and shape. I suggest

taking a flexible wire, moulding it to the cast and then scanning that wire.

Pros: Very accurate method to get a 3D mould of your ribcage.

Cons: You need specific materials and, preferably, a second person to make the

mould on you. It takes a while to dry so for the impatient ones amongst you, you’ll

have to wait at least a day to start working with it.

The result

This root trace on paper is made using the tin foil mould, which was quite easy to

translate to paper. Not only does this root trace allow for an accurate way to

determine wire size and shape, it also makes it possible to make a custom bridge

pattern. After I shape wires after my root trace (more on this in another blog post), I

use the plaster cast to bent them so they follow my body as best as possible.

Which method you choose is up to you, they all have their pros and cons and will all

help you towards a better wire (and thus bra) fit. If you have additional ideas,

suggestions, or want to share how yours turned out, feel free to do so in the

comments!

If you are interested in going the route of sewing bras, there is a process recommended to get started. This post used to be a comment that I'd throw on forum questions and was too long (it was getting out of hand), and I am shortening it by breaking into topics on my blog, covering all the same posts I used to, from many well known makers.  In each of the topics listed below, you'll find many links and as I find new things, they will be added to the topics. This post can be viewed as a sort of table of contents.

Before sewing, I highly recommend fabric kits from the designer whose pattern you are using until you are more familiar with the process and what kind of fabrics are suitable.
https://brasbykristen.blogspot.com/search/label/Fabrics

[1] Wire needs to be the right width from sternum to armpit.[2] The band needs to fit around the body, tight to the sternum in the center front first (independently from cup volume) [3] cups need to be correct volume/shape for YOUR particular anatomy. RTW expects you to fit in the average wire for the average volume for the average band circumference... Which fits almost no one the way it's supposed to... I wrote more about that here...
https://brasbykristen.blogspot.com/p/why-have-custom-bras.html

There’s some great articles out there on the proper way to put the bra on and adequately test it’s volume. Make sure when you get to the step of checking your cups for fit, you know that you have scooped the “girls” into the cups properly.
https://brasbykristen.blogspot.com/search/label/Proper%20Bra%20Wearing

This fitting process can be done to any pattern, and here is a perfect example of this process being applied to the Chloe Pattern by BraMakery’s Natasha, shown by Liz of Youtube's LizSews Channel.

[1] How a wire should fit.
This measurement is taken by Bra-makers either with a flexible ruler or with different sizes of underwires until one properly fits the infra mammary crease. If you find underwires uncomfortable or poking you, more than likely they are the wrong size for your anatomy. Warning: Slight nudity in some of these tutorials.
https://brasbykristen.blogspot.com/search/label/Wire%20Fitting


Wires can be altered to fit. Most people can find some sort of wire shape out there that will work, but some absolutely cannot find one that is shaped properly for the shape of their root. https://brasbykristen.blogspot.com/search/label/Wire%20Alterations


[2] How a band should fit
A Band should be fitted independent from cups. We always tell people starting fresh to bra sewing to make a band with no cups and get that to fit correctly, first. Center against sternum with no breast tissue behind. See picture at end of post with the frame on a mannequin.  There are many posts on this subject, including one that I did with extra seam allowances for being able to alter easily. https://brasbykristen.blogspot.com/search/label/Fitting%20Bands

Once you’ve tried on the fitting band, take note of the alterations that need to be done and stitch them into the fitting band.
https://brasbykristen.blogspot.com/search/label/Band%20Alterations


[3] Then make cups
Start by making the cup size that the pattern designer recommends, because each designer will have their own chart in mind about what measurements make up what name in their sizing system. https://brasbykristen.blogspot.com/search/label/Fitting%20Cups

https://brasbykristen.blogspot.com/search/label/Cup%20Alterations


One more thing, I highly recommend the Eve Pattern if you’re interested in doing some designing, or if you’ve not had any successes with patterns in the past.  The Eve Classic Pattern is as close to a custom draft as is possible in Patterns. Also, if you somehow don’t fit in this range of patterns (which has more than 1000 options for custom sizing) Information can be found here for learning to draft bras from scratch here. https://brasbykristen.blogspot.com/p/the-eve-revolutionary-to-bramaking.html
Sometimes, you find a wire that has the correct shape around underbust, but it is just too tall in the center front, or in the Side Seam areas. Many people figure this out after buying a wire and trying it in their homes, so they have a wire that is too long that they'd like to make usable, and not waste their money. Jennifer shows how to cut a wire and shows one method of what to do with the cut ends to make them soft enough for putting in a bra. You don't want the cut ends to be rough because it will wear a hole through the fabrics, and possibly cut your skin eventually, so you do have to treat the ends in some way.

Some bodies are more cylindrical than others and require bending the wire to keep it from rotating toward the back in the underarm area.  Here's Jennifer's video on a way to do this and when you might need it.


Another alteration that may be necessary is a slight twist to the wire as shown in this facebook post (click here) in the Support forum for Drafting with Bare Essentials Bras (click here). We are hoping to feature a blog post by Grace Horne, showing her videos and how she came to this shape.


Older Posts

Project Sewing Vault

  • Sewing Courses
  • My Shop's Blog
  • Link List and Newsletter Signup

HELLO, THERE!


Hello, There!

Welcome! There's nothing quite like the self esteem boost of moving into a well-fitting bra. Click the links above and hopefully you'll find something you didn't know previously about custom bras.


Find More


Translate

Bra-Making Blog Post Labels

  • Sew Along
  • Wire Fitting
  • Fitting Bands
  • A Day in the Life
  • Band Alterations
  • Never Sewn Before? Start Here!
  • Proper Bra Wearing
  • Fitting Cups
  • Cup Alterations
  • Measuring for Bras
  • Wire Alterations
  • Fabrics
  • History of Bras
  • Sloper Manipulations

Bra-Making Blog Posts Archive by Date

  • ►  2020 (42)
    • ►  February (22)
    • ►  March (19)
    • ►  December (1)
  • ►  2021 (8)
    • ►  January (6)
    • ►  February (2)
  • ▼  2022 (1)
    • ▼  January (1)
      • tutorials and blog posts from around the internet

Sponsor

Ko-fi is a platform for supporting artists for their work but is different from Patreon in that you don't have to do a monthly subscription if you don't want to. For anyone interested in donating for the efforts here and in our drafting forum on Facebook, you may arrange payment through Ko-fi.

https://ko-fi.com/brasbykristen


Pageviews past week

Created with by beautytemplates