How to Shape your Wire
Here's the final installment on Anne Bertha's guest posts regarding root traces and wire alterations!
How to shape your wire
by Anne Bertha
So, you’ve made a plaster cast but you’re not sure how to translate this three dimensional
shape to a two dimensional pattern? Then this post is perfect for you.
Making a bridge pattern and wire trace off your cast
What you’ll need:
● Your cast (well duh)
● Paper
● Masking tape
● Some sort of flexible wire
I first present you... My cast!
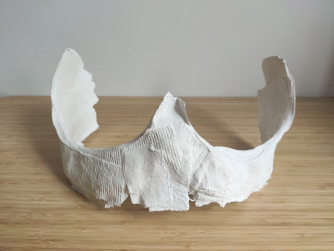

Let’s start with the bridge pattern. Stick a few pieces of masking tape to the inside of the cast
bridge, carefully peel it off and stick it again on a sheet of paper. There’s no need to follow
the wire line to the millimeter, we’ll take care of that later.
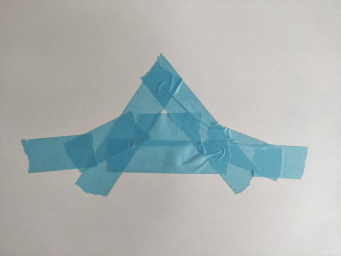
Then, trace your bridge shape to another piece of paper and label it left and right.
Remember that these will not be mirrored! After this, my bridge pattern looks like this.
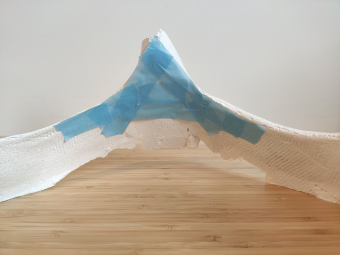
Next, it’s time to take your flexible wire and mould it to one of the wire lines of the cast. This
can be tricky to do with acceptable accuracy, so make sure you take your time.

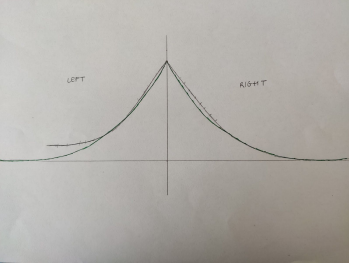
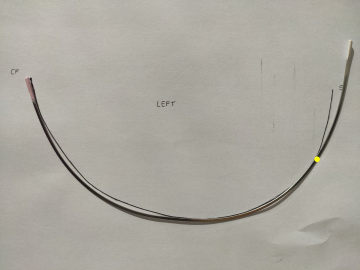
Remember when I said we’ll do something about the inaccuracy of the wire line at the
bridge? The time is now. Simply make a copy of your bridge, lay your wire on the according
side of and trace the bit at the bridge. My actual wire trace is marked in green in the picture
below. Note: the low point of your left and right breast root might not be on a horizontal line
as in my case, one might be lower than the other. This can best be determined standing in
front of a mirror. You want to account for it in this step if applicable.
Now it’s time to determine whether you’re one of the lucky people who fits in a ‘standard’
wire. Print off some wire charts and match your flexible wire to the charts. Try rotating it,
flipping it, whatever may work for you. If you find a match, awesome! The quest ends here
for you. For the other ones, I will describe a method you can use to shape wires after your
individual shape.
A little bit of science
The method I’ll be using was developed by a fellow Bare Essentials drafter. She used the
property of metal that when hammered on a particular area, that area will stretch. This forces
the metal to bend slightly. A wire is basically a flat, thin strip of metal which is bent. You can
manipulate this bending by hammering on the inside or the outside of the wire with the ball
end of a ball-peen hammer. I’ll explain this using the picture of a metal ruler.

If you would want to curve it like in the picture below, it means that the top will have to be
longer than the bottom.

To get this result, we would have to hammer the top of the ruler since we want that side to
lengthen. Basically, that’s the technique used to shape wires after your very own trace.
How to apply the science
First, some preparation steps. Trace the inside of the flexible wire. The center front is fixed, I
marked a black dot there to show that this is the highest point of my bridge. The side
however is more up for interpretation, the height kind of depends on how high you made
your cast. It will work for now, you can determine the exact side height afterwards by trying
on your customized wires.

To get started with the next few steps, you’ll need uncoated wires. I started from regular
wires size 60. They are not heavy gauge, so I will be doubling them up inside the
channeling. The fact that they are a more regular gauge does mean that the following
process will be easier.
You will need a ball-peen hammer and an anvil or a table vise with anvil-like attachment.

Start at center front, and lay the inside of your wire against the trace. Try following the traced
line as far as possible. You’ll notice that at some point, the trace and the actual wire will
diverge. Mark this point on both sides of the wire.

If you would recreate this image, you would notice that if you ‘stretch’ the wire to match the
trace, you actually need to stretch the inside of the wire. This means I needed to hammer on
the inside of the wire around the marked point (going 1⁄2” or 1.2 cm left and right) to bend the
wire into the shape of the trace. Always make sure you hammer on both sides of the wire
(front and back), since otherwise the wire will distort.

After hammering, the wire looks like this. I again marked the diverging point. Now, the wire
needs to be stretched and thus hammered on the outside to make the wire curve inward
towards the trace.
Here’s the final result. Be sure to mark your wire as soon as you finish them.

Acknowledgement: this post would not have been possible without the knowledge of Grace
Horne. I will always be grateful to her.

0 comments
Please be kind, y'all!